Thanks for watching... cj :D
Thursday, November 21, 2013

Wednesday, November 20, 2013
Tuesday, November 19, 2013
Less-ology #31 Toy Story December 2013 Video and pictures.


Pictures of the process..

An old sock monkey, lots of burlap, pine cones, and lots of extras.

I painted the wooden tree green and brown, then glued on burlap trim.
For the drum, I painted the old spool brown and green then
glued on the wide burlap trim. There is a wooden child's
block that is hidden in the pine cones..
Lots of 8" strips of burlap were tied to the coat hanger.
A few pine cones were glued and glittered. This will
hang on my daughter front door and she is
"anti-bling"..so I tried make it with more
natural/nature items..

A completed wreath. With an old sock monkey, a wooden
spool drum, a wooden tree with burlap trim, and lots of
pine cones.
Thanks for stopping by. Please leave a comment. :D
Sunday, February 17, 2013
A "Charming" Paper Bag
LESSology Challenge... #22
(Webster's dictionary, "Charming" is delightful and pleasing.)
My goal was to re-use the white paper bag and make it into something "CHARMING" without spending any money and still create something beautiful. I only used what I had in my stash...
I wanted to create a scene where we are looking out a window at a little girl playing with her puppy. I would say this turned out very delightful, pleasing, and charming.
This project was made from a white paper deli bag. I used Bo Bunny Paper and Flowers. Glossy accents to bring out the beads and puppies face and La Peti flowers and ribbon from The Paper Studio.. Old lace from a wedding dress. A poem about "Friendship" from Henri Nouwen . and a beautiful corsage laced flower from a friend.


(Webster's dictionary, "Charming" is delightful and pleasing.)
My goal was to re-use the white paper bag and make it into something "CHARMING" without spending any money and still create something beautiful. I only used what I had in my stash...
I wanted to create a scene where we are looking out a window at a little girl playing with her puppy. I would say this turned out very delightful, pleasing, and charming.
This project was made from a white paper deli bag. I used Bo Bunny Paper and Flowers. Glossy accents to bring out the beads and puppies face and La Peti flowers and ribbon from The Paper Studio.. Old lace from a wedding dress. A poem about "Friendship" from Henri Nouwen . and a beautiful corsage laced flower from a friend.

This is the front of this re-purposed bag.
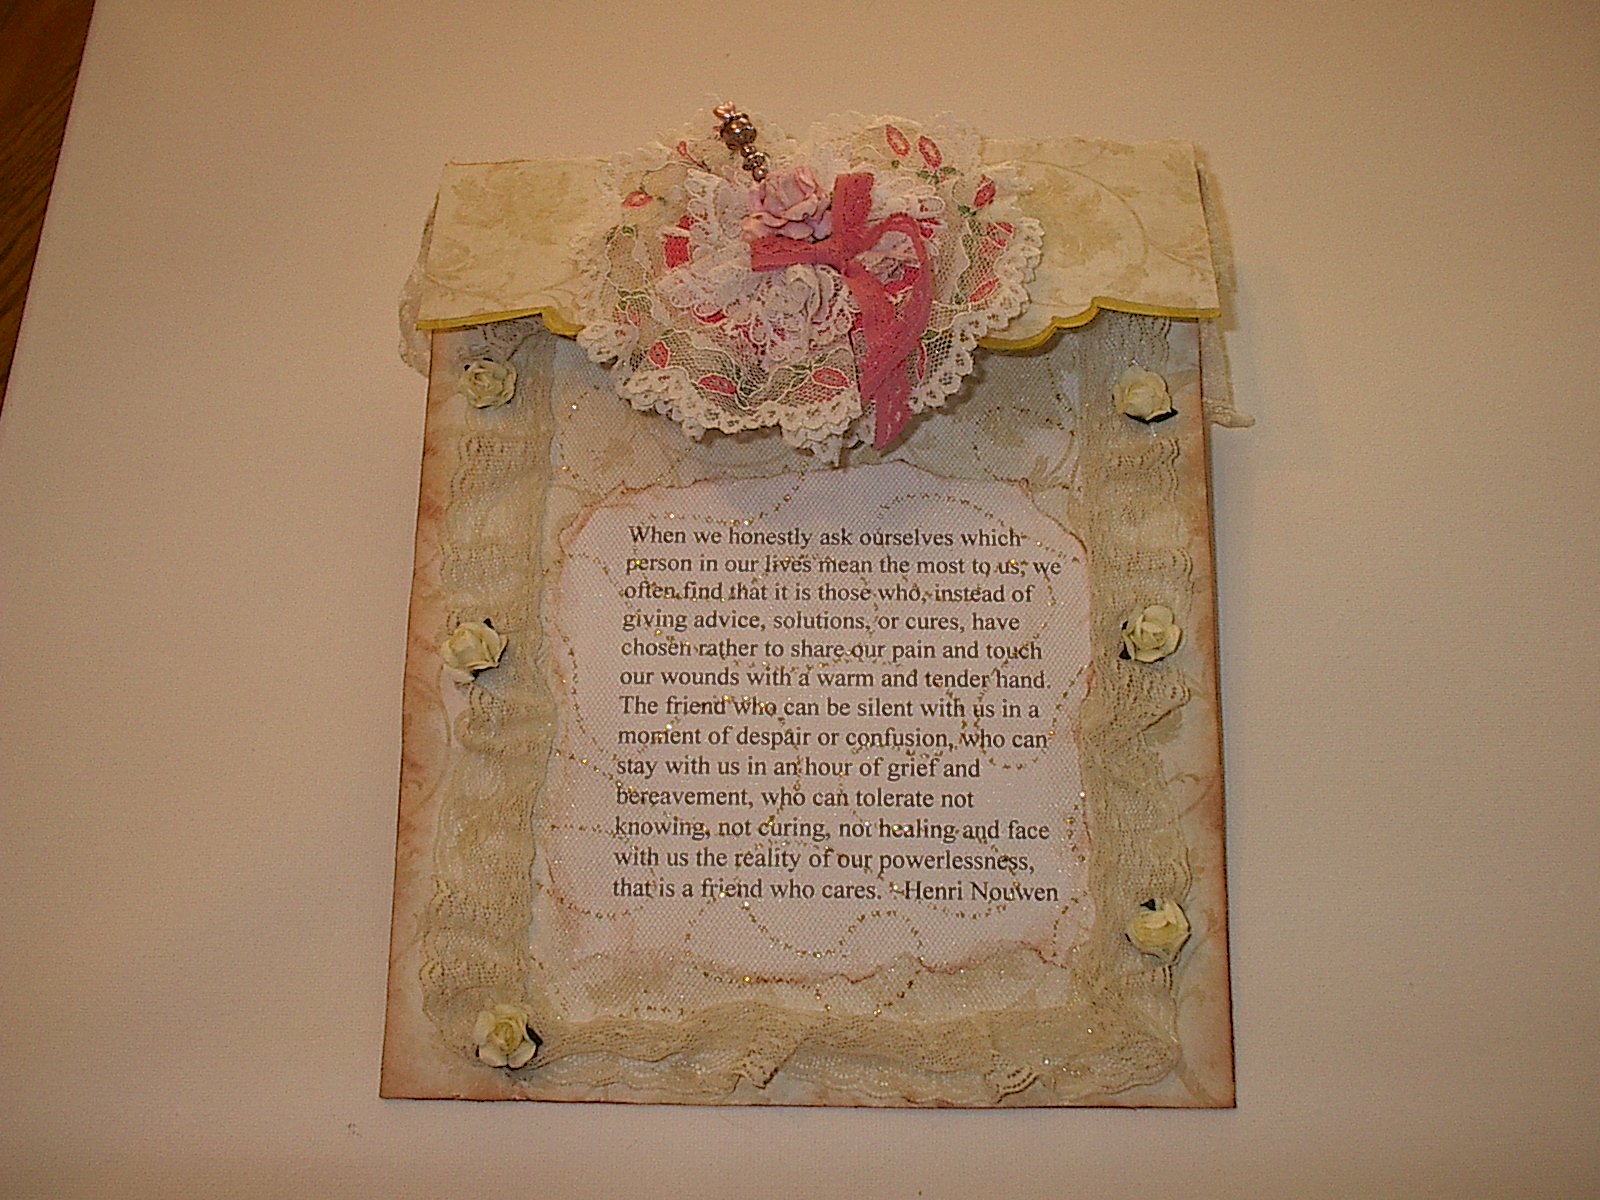
This is the back of the bag.

This is a close up of the front of the bag.
Here is a detailed .. : D

Charms sewn in with trim.

A flower charm attached to stick pin and a
lock and key charm on the edge of the flap.
Thanks for stopping by.. please leave a comment. cj
Thursday, February 14, 2013
Mixed Media Challenge #3 at YPP
I had several prints that I thought I would try using Craypas on for the challenge..


This was the first attempt, which was okay..

This was the second attempt.. and I think I like it better.. I'm more about
bright colors.. but I am pleased with both pics..
Please leave a message so I know you came for a visit.. Thanks cj
Saturday, February 9, 2013
Hostess Gifts, Inchies, Envelopes, Tickets, and cards
I made some hostess gifts for some swaps I'm in over at Your Paper Pantry.


Finally I used my favorite stamp to complete two swaps at Your Paper Pantry. A mare and here new born is the stamp that touches my heart. So I used it for the note card swap and for the greeting card swap.. and attached a horse shoe charm.


Mini Journals.
Then I completed 100 Inchies for a swap over at Split Coast Stampers.

One squared inch of creative art work.
Then I made my mail art..envelopes and tickets for swaps at Your Paper Pantry.

Envelope theme was: The Key to my Heart
The ticket themes were: St. Patrick's Day,
Easter, and Spring.
Finally I used my favorite stamp to complete two swaps at Your Paper Pantry. A mare and here new born is the stamp that touches my heart. So I used it for the note card swap and for the greeting card swap.. and attached a horse shoe charm.

Then today I completed two more projects. A challenge at Your Paper Pantry to used corrugated cardboard.

The background is cardboard and the heart was crimped.
I took the same idea and created a cute card with a Peachy Keen stamp for one of their challenges.

This little mouse so loves his cheese.
So much fun! Leave me a message so I know you came for a visit.. cj
Tuesday, January 22, 2013
Raisinboat Challenge #7
Raisinboat Challenge #7

I had a picture in my mind before I even
received my stamps. So this is
how it all came together.
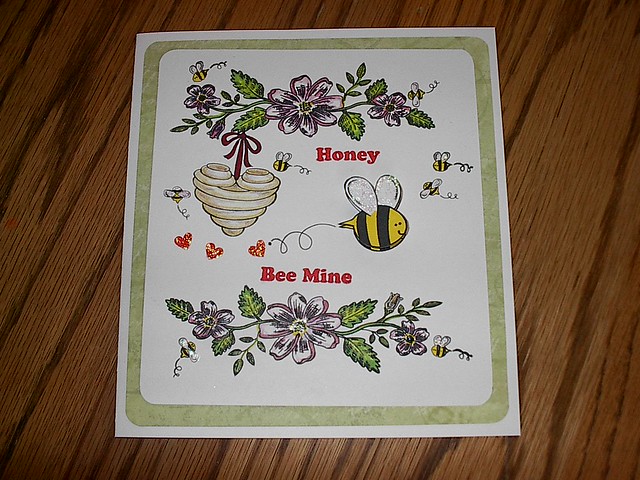
The flowers were stamped from Raisinboat
"All in Toile"
Then the rest of the card was stamped from
Raisinboat "Wild about you, Honey!"
The hearts, bee's wings and flower centers
were glittered with gel. The color was
added with colored pencils and
markers. The large bee was popped
up on dots.. This was so much fun!
Please leave a comment so I know you
came to visit.. Many Thanks. cj
Monday, January 21, 2013
My Re-purposed card
Linked to:
"What are you known for?"
1/27/13
I am best known for re-using, re-purposing
and re-creating things that someone
else might throw away.
Challenge #21 incorporat a heart.
2/3/13
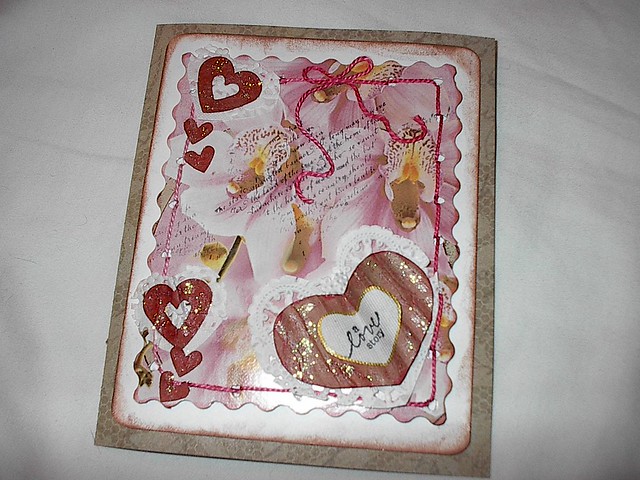
My Repurposed Card
I started with a card board box and
paper sack.
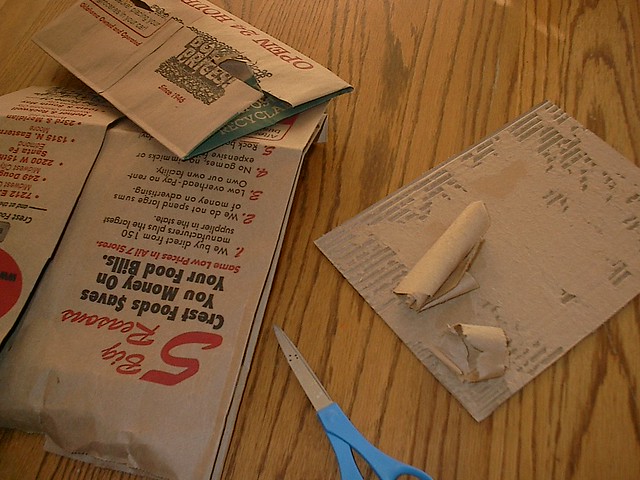
I died the card board and sack with cool aid.

I used a tissue box for the background paper.
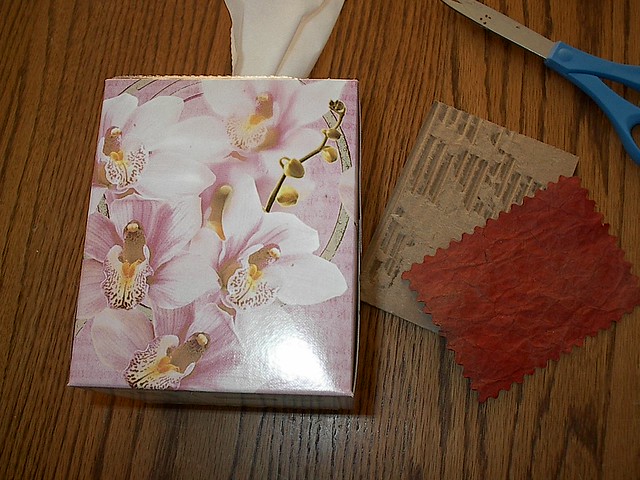
I mounted my pieces on some white cardstock.
Punched heart shaped holes and wove some
pink fiber through them. I glued the hearts to
some doilies I made and popped them up. Then
stamped the background with words.. and the heart with,
"A Love Story"....

Thank you for visiting. I hope you enjoy my
Repurposed Card.
cj..
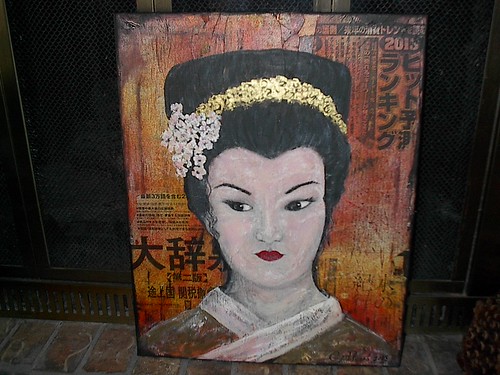
A Painting for Jim P..
This painting is one I created as a thank you to Jim.. He brought back from Japan a news paper. So I glue the paper to the canvas and painted the Geisha. "Asian Mystery" is the title.

Thank You Jim..
Wednesday, January 16, 2013
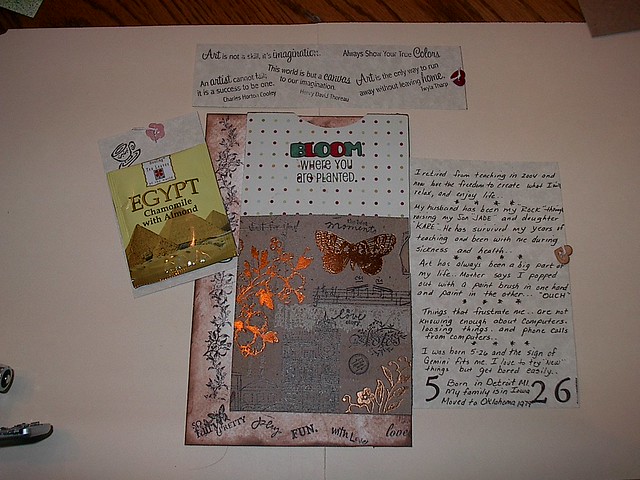
Journal Page for Linda L.
I was too late in joining a swap on Your Paper Pantry. So Linda asked if I would care to swap a journal page. and I was thrilled to do so. The theme was, "Who Am I"?
 I created two pockets.. one on top and one on the side that held some information about me. I also had a pocket on the front to hold some tea. then on the other side.......
 I created a silhouette of my face....and added some quotes.. I was very pleased with the way it turned out. Someday I'll send a picture.. but for now Lupus has invaded my face with lessions....and I've been over a year..try different medications ... that have not worked.. but I'm sure some will soon..
Thank you for stopping by.. Please leave a comment.. thanks. cj

Thank you for stopping by.. Please leave a comment.. thanks. cj
Busy Making Stick Pins
I've been busy making stick pins. Last count was around 90 that I have completed.. Here are a few of the swaps that I am in for Stick Pins.

These stick pins were placed into flowers that I had
made. and sent in a swap for Your Paper Pantry.
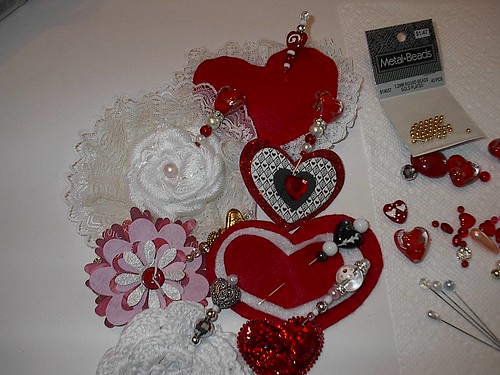
These stick pins were for a swap on Swapbot..
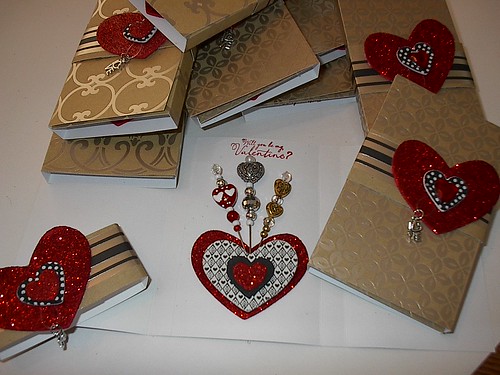
These stick pins were for a swap on 2 Shappy Sisters
Studio.
Thanks for visiting.. Please leave a comment. cj
January 2013 Mail Art
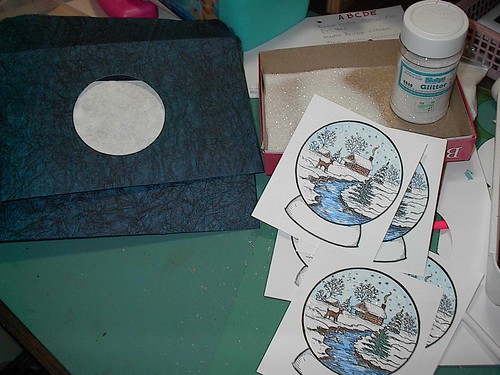
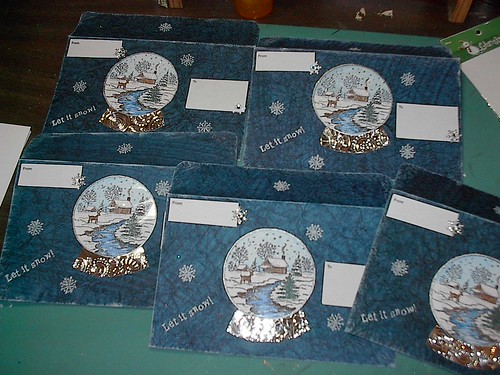
For January 2013. We created winter theme envelopes at Your Paper Pantry. I have taken this very thick crinkled paper and cut a hole in it after folding it into an envelope. I tried to make the picture look as those it were a snow globe with pieces falling down...but the pieces kept sticking to the plastic on the globe. But over all I thought it turned out cute.


Thank you for visiting.. Please leave a comment. cj
Thank you for visiting.. Please leave a comment. cj
Repurposed ...Stick pin holder
This was a swap on 2 Shabby Sisters Studio. We were to take a dollar store candle stick and glue to it some kind of contain.. the decorate in white and blue and create a stick pin holder.


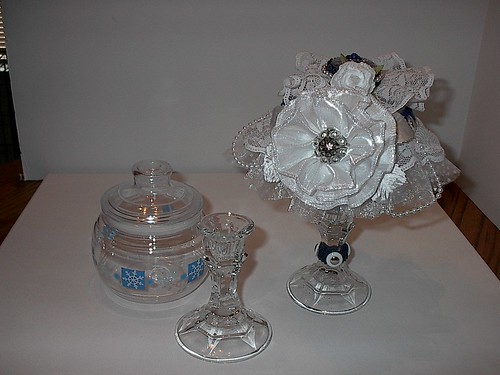
This picture shows the plactic bowl that I used E6000 to glue to the
Candle stick. and a completed Stick Pin holder next to it.

In this picture. you can see inside the bowl area where
I created a pillow for the stick pins.
I hope you enjoy this creation. Please leave a comment. cj
Lessology Challenge #21 "Hearts"
Lessology Challenge #21....... "Angel or Fairy repurposed from an old quilt"
I collect old Cutter Quilts. These are quilts that are totally worn out and can no longer be repaired.
I've created a new pattern using these quilts and hearts.
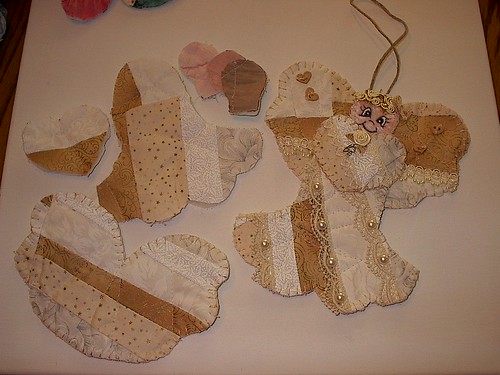
In these pictures I will show you how I will cut out pieces from these old quilts using several hearts and modified hearts to create a new, repurposed item. We will call it an Angel or Fairy with many purposes.


I collect old Cutter Quilts. These are quilts that are totally worn out and can no longer be repaired.
I've created a new pattern using these quilts and hearts.
In these pictures I will show you how I will cut out pieces from these old quilts using several hearts and modified hearts to create a new, repurposed item. We will call it an Angel or Fairy with many purposes.
This is were I have cut apart the pieces needed for
the "Angel or Fairy"

On the left it shows the pieces, and on the right
it shows the completed "Angel" ready to be
sent to a new bride..
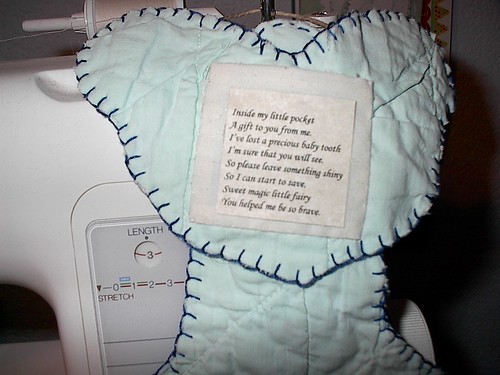
This pictures shows a "Tooth Fairy" that was completed
from another old quilt.

On the back of this "Fairy" I made a pocket that has a
little poem I made about tooth fairies.. The tooth can
be slipped into a zip lock baggie and ready to
trade the tooth in for some coins..
These are all original works of art by me...
CJ Plumb
I do not sell them...
Thank you for visiting.. I hope you enjoy my creation. Please
leave a comment.. cj
Wednesday, November 28, 2012
Beyond Grey Challenge #21.. Red, Green, Black
This card was made for the "Beyond Grey Challenge #21" November 2012
The "ONLY" colors that were used in this card were RED, GREEN, and BLACK.
(there's no white, it's just were the green is much lighter)
The paper I used is just what I had on hand in my ( re-use re-purpose ) bin.
Colored pencils, Ranger black Ink, Red bling,
Stamps by "Christmas Crafts, and PSX
Corner punch by Fiskars

The "ONLY" colors that were used in this card were RED, GREEN, and BLACK.
(there's no white, it's just were the green is much lighter)
The paper I used is just what I had on hand in my ( re-use re-purpose ) bin.
Colored pencils, Ranger black Ink, Red bling,
Stamps by "Christmas Crafts, and PSX
Corner punch by Fiskars

I hope you enjoy my card. Please leave a comment. Thank You!
Your Paper Pantry Monday Challenge11-26-2012
For the "Your Paper Pantry" Monday, November 26, 2012 challenge I created a Tea Wallet.
We were to take a toilet paper tube and create a new project.


We were to take a toilet paper tube and create a new project.
Supplies:
Bo Bunny and Colorful Life paper
Ribbon and lace
A large pearl
A flower I made from ribbon
A Mary Engelbreit sticker
and two tea bags

Then, from these supplies:

I created the Tea Wallet.

The ends pull out and will hold two tea bags on the tags.
Hope you enjoyed my Tea Wallet. cj
Friday, November 23, 2012
Raisin Boat Challenge #6 "Thank You"
Second picture for Raisin Boat Challenge #6 "Thank You"
Completed 11/23/2012

Supplies used:
Recollections Stamp
Recollections paper
The Paper Studio paper
Glossy Accents
Zing Embossing Powder
Sharpie Gold Paint
Versa Mark
Buttons

I hope you enjoy this card. "Thank You"
This picture is for Raisin Boat Challenge #6 "Thank You"
Completed 11/23/2012

The stamped image and paper is by "Recollections"
The white layer has been raised to add
dimension and edged with "Rusty Bucket" chalk ink.
The leaves have "Glossy Accents" and the berries are
red jewels by "The Yellow Bicycle"
I made the flower from "Gallery" ribbon and
add a half pearl for the center.
The card was then sprayed with "Gold Glimmer Mist"


I hope you enjoy this card. "Thank You"
Friday, November 16, 2012
LESSology #20 Nov. 2012 "Barely There"
LESSology #20 Nov. 2012 "Barely There" "WINNER" completed Nov. 16, 2012

http://lessology.blogspot.sg/
Some of the supplies used.

Here is the "clear" cassette tape holder I used. Just open it up and fold it back as far as it will go.

I found a Christmas card and fussy cut trees for the front. Add Recollections ribbon around the edge. Glued a button snowman next to the trees. Then the smaller tree on the right I popped it outward for dimension with pop dots. The edge of the case was painted with gold Sharpie paint.

I completed the front with The Studio Paper, a holly button, Rhinestone Stars and the words Peace At Christmas cut from the Christmas Card.

The completed case is now shown holding a business card. Or it can also hold pictures, post cards, or recipes..

* * * * * * * * * * * *
At this point I could have called it finished.. But I kept looking at the back and thought it just needed a little something more.. So, I turned it around and created a second scene.

So here you will see I have turned the cassette case around and started another scene. I cut a piece of vellum from a bag and added stickles to make it look like a pond that had the markings of ice skaters. Then you will see styrofoam for the mound of snow and glass bead trees. I used a stick pin to hold them in the styrofoam, then placed glass globs around to add the cold weather feel of ice and snow.

The back side of the cassette case is now completed. I used The Paper Studio and Bo Bunny paper. A Christmas Craft stamp by Hobby Lobby was used to stamp the message. Now it is ready for some ice skaters to have some fun.
Hope you enjoy my creation, and please leave a comment. Many Thanks.
http://lessology.blogspot.sg/
Some of the supplies used.

Here is the "clear" cassette tape holder I used. Just open it up and fold it back as far as it will go.

I found a Christmas card and fussy cut trees for the front. Add Recollections ribbon around the edge. Glued a button snowman next to the trees. Then the smaller tree on the right I popped it outward for dimension with pop dots. The edge of the case was painted with gold Sharpie paint.

I completed the front with The Studio Paper, a holly button, Rhinestone Stars and the words Peace At Christmas cut from the Christmas Card.

The completed case is now shown holding a business card. Or it can also hold pictures, post cards, or recipes..

* * * * * * * * * * * *
At this point I could have called it finished.. But I kept looking at the back and thought it just needed a little something more.. So, I turned it around and created a second scene.

So here you will see I have turned the cassette case around and started another scene. I cut a piece of vellum from a bag and added stickles to make it look like a pond that had the markings of ice skaters. Then you will see styrofoam for the mound of snow and glass bead trees. I used a stick pin to hold them in the styrofoam, then placed glass globs around to add the cold weather feel of ice and snow.

The back side of the cassette case is now completed. I used The Paper Studio and Bo Bunny paper. A Christmas Craft stamp by Hobby Lobby was used to stamp the message. Now it is ready for some ice skaters to have some fun.
Hope you enjoy my creation, and please leave a comment. Many Thanks.
Subscribe to:
Posts (Atom)